Pages

Wednesday, November 30, 2016

Rich HTML Responses, Buttons, Links, and Choices

Bot Libre allows for bot responses to contain rich content including bold text, fonts, styles, colors, images, video, audio, bullets, , links, and much more.

Bot responses can be plain text, or can contain HTML and even JavaScript content. HTML includes tags for bold, style, fonts, bullets, buttons, links, and much more. For more information on HTML see w3schools.

Bot Libre supports HTML on the web, and on mobile. For social media platforms, such as Facebook, Bot Libre maps the HTML content that is supported by the social media platform into their own native syntax, and strips any HTML content that is not supported. Bot Libre supports buttons, links, images, video, and audio on Facebook by mapping HTML elements to Facebook's button and link support.

HTML

Bot Libre supports most simple HTML, but filters complex HTML content to remove JavaScript and other potential security issues. It is possible to allow JavaScript and complex HTML in your bot by enabling the 'Allow JavaScript' option in your bot's learning settings (for security reasons, JavaScript is only available on botlibre.biz).

You can use HTML in bot responses to make them look more impressive, or to include media content such as images, video, or audio.

Example HTML response

You can <b>email</b> us at <a href="mailto:sales@botlibre.com">sales@botlibre.com</a>
<br/>or <b>phone</b> us at +1-613-777-1234
<br/>For other contact info see our <a href="https://www.botlibre.com/contact.jsp">website</a>

You can email us at sales@botlibre.com
or phone us at +1-613-777-1234
For other contact info see our website

Example media response

Check out our new robot<br/><img width="100" src="https://www.botlibre.com/avatars/at11879715.jpg"/>

Check out our new robot

Buttons, Links, and Choices

You can also use interactive HTML in your bot's responses to engage the user, and improve their user experience.

The HTML <button> tag can be used to provide the user with easy one click options. Bot Libre automatically associates a button click with a post back to the bot with the button text as the message.

Example button response

Do you want to book an appointment?<br/>
<button>Yes</button> or <button>No</button>

Do you want to book an appointment?
or

Bot Libre defines a special protocol for HTML links that allows the link click to send a post back message to the bot. Using the chat: protocol in any link, you can have the chat message sent to the bot when the link is clicked.

Example link response

Do you want to to order a <a href="chat:large">large</a> or a <a href="chat:small">small</a>?

Do you want to to order a large or a small?

Example choice response

What kind of pizza do you want to order a <select><option></option><option>cheese</option><option>vegetarian</option></select>

What kind of pizza do you want to order a

Commands for Social Media and Mobile

Bot Libre automatically translates HTML into the features supported by social media platforms like Facebook, Twitter, Telegram, and Slack. Bot Libre also provides a command tag to a response to enable it to invoke platform specific features.

A command is a JSON formatted object that is passed to the mobile client, or social media connector. Commands can be used in a "response list" file, the bot's Training page, or from scripts. For mobile, commands can be used to execute virtual assistant functions like opening apps and sending email from a phone. For Facebook, commands can be used to add buttons, and templates to a response.

For more information on mobile commands see, How to Use Commands.

Bots are the New Apps

"Bots are the new apps", this means that software development has shifted from building websites, to building mobile apps, and now to building bots. Bots lets you build a single interface into your business that can be deployed to the web, mobile, and social media.

Rich HTML responses enable bot's to behave like conversational apps, and provide a rich, easy to use, user experience.

Thursday, November 24, 2016

Announcing Bot Libre 5.0!

We have released Bot Libre 5.0!

The worlds most advanced bot platform just got better. Bot Libre 5.0 is a free and open source platform for developing and hosting bots. Bot Libre 5.0 includes support for chat bots, virtual agents, virtual assistants, social media bots, live chat, animated avatars, and speech. Bot Libre supports bots for the web, mobile, Facebook, Twitter, Telegram, Slack, email, SMS, IRC, and new platforms are being added every month.

"Bot are the new apps". Mobile has replaced the web as the main communication market, and social media apps are the most popular mobile apps. Businesses need to connect with consumers on the platforms they use, so it now makes more sense for a business to create a bot/chat interface into their business instead of a website, or their own mobile app. Bot Libre lets you create a bot for yourself or your business and deploy the bot to the Facebook, Twitter, Telegram, Slack, the web, mobile, and other services. Bots let you "write once deploy everywhere".

Bot Libre 5.0 supports rich HTML responses including buttons, links, choices, images, video, and audio. Bot Libre supports HTML responses on the web, mobile, and automatically maps HTML to social media platforms.

Bot Libre bots can be trained using natural language, chat logs, response lists, Twitter feeds, AIML, and scripting. Responses are automatically matched using a heuristic artificial intelligence algorithm and do not require any programming. Responses can also use keywords, topics, required words, labels, repeats, and other meta data.

Bot Libre 5.0 supports programming and scripting your bot using AIML 2, and Self. Self is our own dialect of JavaScript. Self is an object oriented scripting language, and integrated with an object database. Self extends JavaScript to provide support for natural language processing, state machines, object persistence, and includes a class library for accessing web services and utilities. Self also supports all AIML 2 operations, and some aspects of ChatScript patterns.

New features in Bot Libre 5.0 since 4.0 include:

  • Rich HTML responses including buttons, links, and choices
  • Facebook Messenger support
  • Facebook Messenger support for HTML responses including buttons, links, images, and other tags
  • Telegram support
  • SMS text messaging and Twilio support
  • XML and JSON web service support from scripting
  • HTML scraping and social media support from scripting
  • Vision and image processing support
  • Support for uploading files and images to the bot, and file processing
  • Automatic language translation
  • Slack support
  • Google Calendar support
  • New speech and avatar options
  • Mobile command and virtual assistant support

Create your own free account and bot today on botlibre.com, or let us build your bot for you on our commercial service Bot Libre for Business.

Wednesday, November 9, 2016

Connecting your bot to Google Calendar

Bots can do more than just chat. They can book appointments, service calls, meetings, send emails, and SMS messages.

Bot Libre has support for connecting your bot to Google Calendar to access your schedule and book appointments. To connect your bot to Google Calendar go to your bot's "Google" page in its "Admin Console".

To get to your bot's Admin Console click on the button below its "Chat" button on its page.

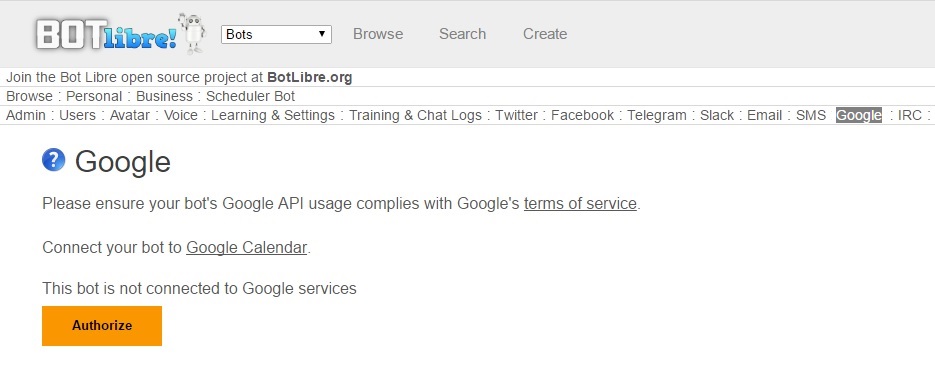
Next, click on the Google tab.

Click on the Authorize button to connect your bot.

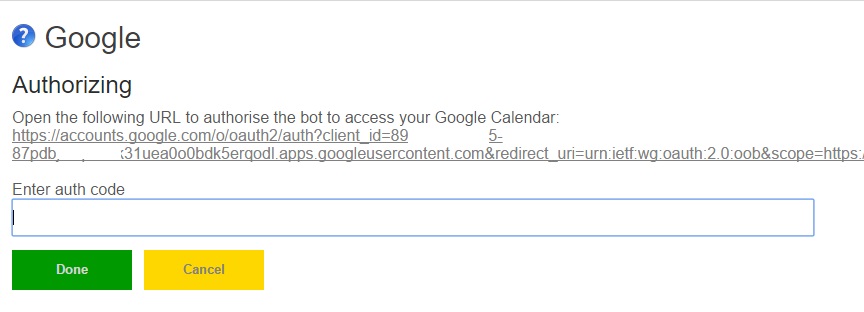
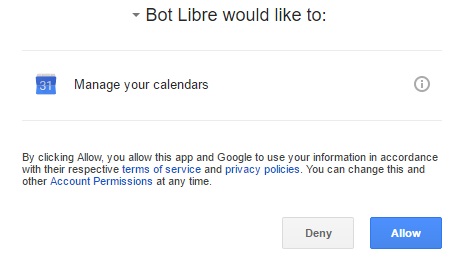
This will give you a link to Google. Click on the link and accept the authorization request.

You will need to login to your Google account. If you want the bot to have its own Calendar you can create a separate Google account. If you do not have a Google account or Calendar you can create one first here.

After you accept the request Google will give you a code.

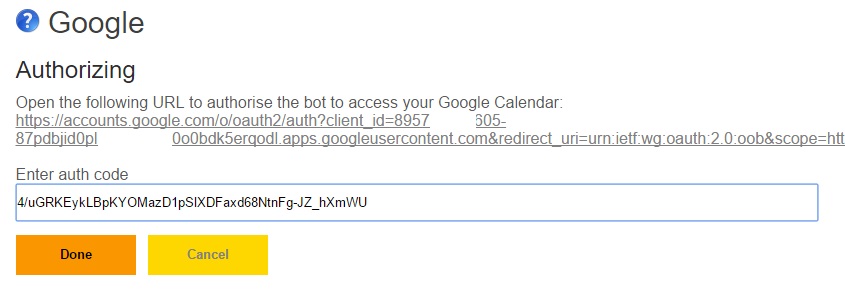
Copy this code and go back to the Bot Libre page and paste it in the text field.

Click "Done".

Your bot is now connect to your Google Calendar and has permission to access it.

You can use the GoogleCalendar class from a Self script to access your calendar.

The GoogleCalendar class has functions like getEvents(from, to), insertEvent(event), and deleteEvent(event). The event objects are Self objects that match Google Calendars JSON format. You can also call requestJSON(url), or postJSON(url, json) to call any Google Calendar web API. For more information of Google Calendars web API see Google's API reference.
If writing your own script seems too complicated, you can also import existing Calendar scripts from our script library.

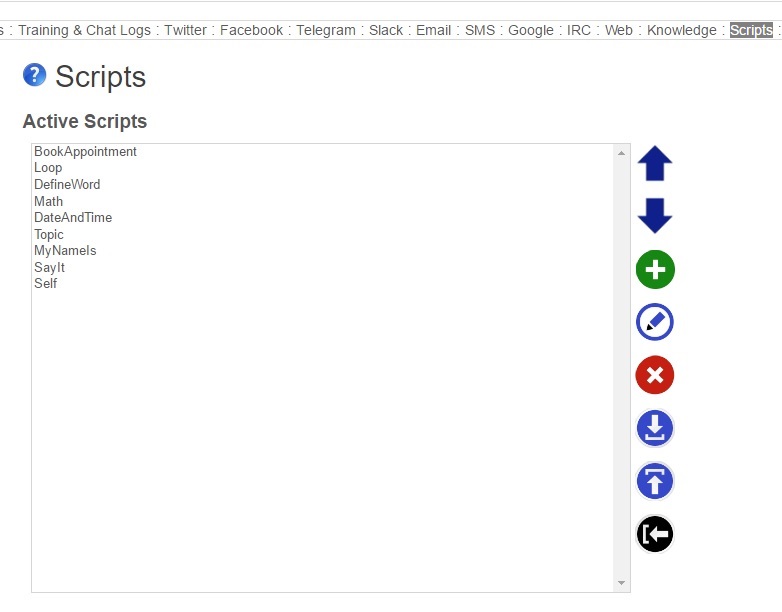
In your bot's Admin Console go to its "Scripts" page.

On your bot's Scripts page there is a blue "Import" button on the right toolbar.

Click on this button to import scripts into your bot.

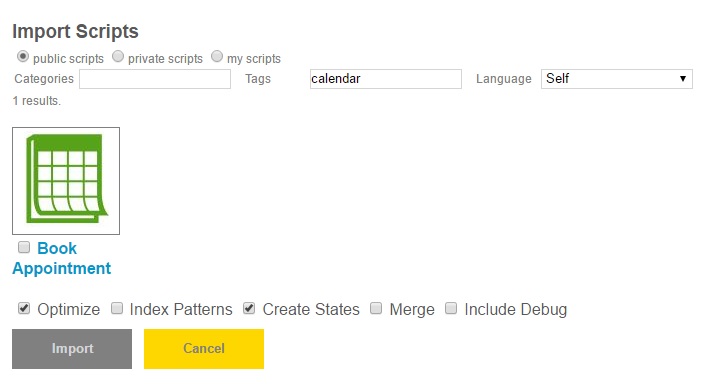
This will give you a lot of scripts to choose from, filter them but typing "calendar" in Tags and "Self" in Language.

Select the "Book Appointment" script and import it.

This script gives your bot the "book" and "cancel" commands that lets a user book appointments to your calendar.

For an example, talk to the Scheduler Bot, or create your own scheduler bot using the scheduler_template.

Wednesday, October 19, 2016

Fanbots - bots in the music and entertainment industry

Bots are commonly used in e-commerce, education and travel industries, but also have great potential in other industries, such as music and entertainment.

Music and entertainment artists need a way to connect with their fans on the web, mobile, and through social media. Many famous entertainers and musicians are good at using social media to promote themselves and keep their fans up to date. Up until now social media has been mainly one-way communication, as it is not possible for an artists to connect directly with millions of fans. Now, with most social media platforms supporting bots, it is now possible for an artists to connect directly with all of their fans.

An artists can create a bot for themselves, or for their band, or brand. They can connect the bot to social media such as Facebook, Twitter, Telegram, Kik, and others. The bot can be trained directly by the artist, or through their agent or a service, to answer common questions from fans, quote their lyrics, or provides audio samples of their music.

An example of bots used in the music industry is Deathbot. On October 10th Deathbot took over the bands Avenged Sevenfold's website to promote their upcoming single. Deathbot was hosted on Bot Libre. Bot Libre made it easy for the bot to be trained to answer fan questions without any requiring any programming, and Bot Libre's animated avatar support helped the bot engage fans on the web.


If you are famous, and looking to connect with your fans, email us at fanbots@botlibre.biz. We can develop your bot for you, and connect it to social media. If you have millions of fans we can setup your own dedicated server through our Bot Libre for Business Dedicated service plan.

Friday, October 7, 2016

How To Connect a Bot to Slack

Through Bot Libre, you can now send and receive messages on Slack with your own bot. You can use this to chat with your bot through Slack or have your bot monitor and response to users in a Slack channel. This "How To" will give you a step by step process to connect your bot with Slack.

Step 1 - Create a Bot

First you must create a bot that you want to connect to Slack, or you can use one of your existing bots. To create a bot, follow the instructions here: How to create your own virtual agent in 10 clicks.

Step 2 - Create a Slack team

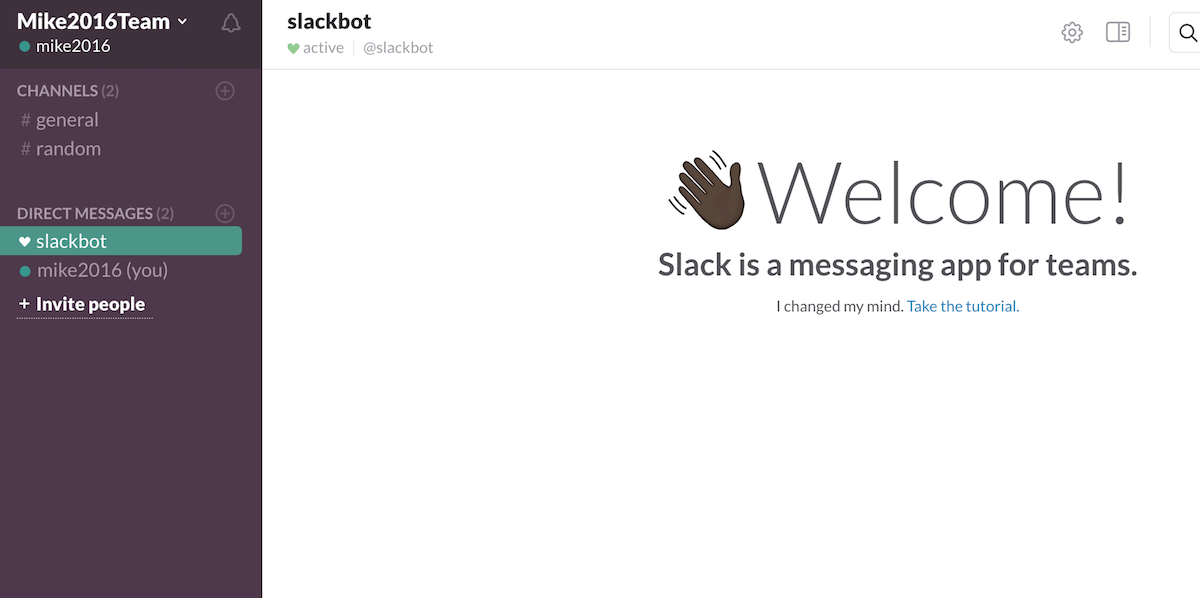
Go to http://www.slack.com and create a team.

You will receive a confirmation code via e-mail which you will need to enter on the next page.

Finish filling out information for your username and team name and then continue.

Step 3 - Setup Custom Integration

You will now need to set up a custom Slack integration for your bot. Click your team name in the top-left part of the screen and select "Apps and integrations" from the dropdown menu that appears.


Click the "Build" button at the top-right.

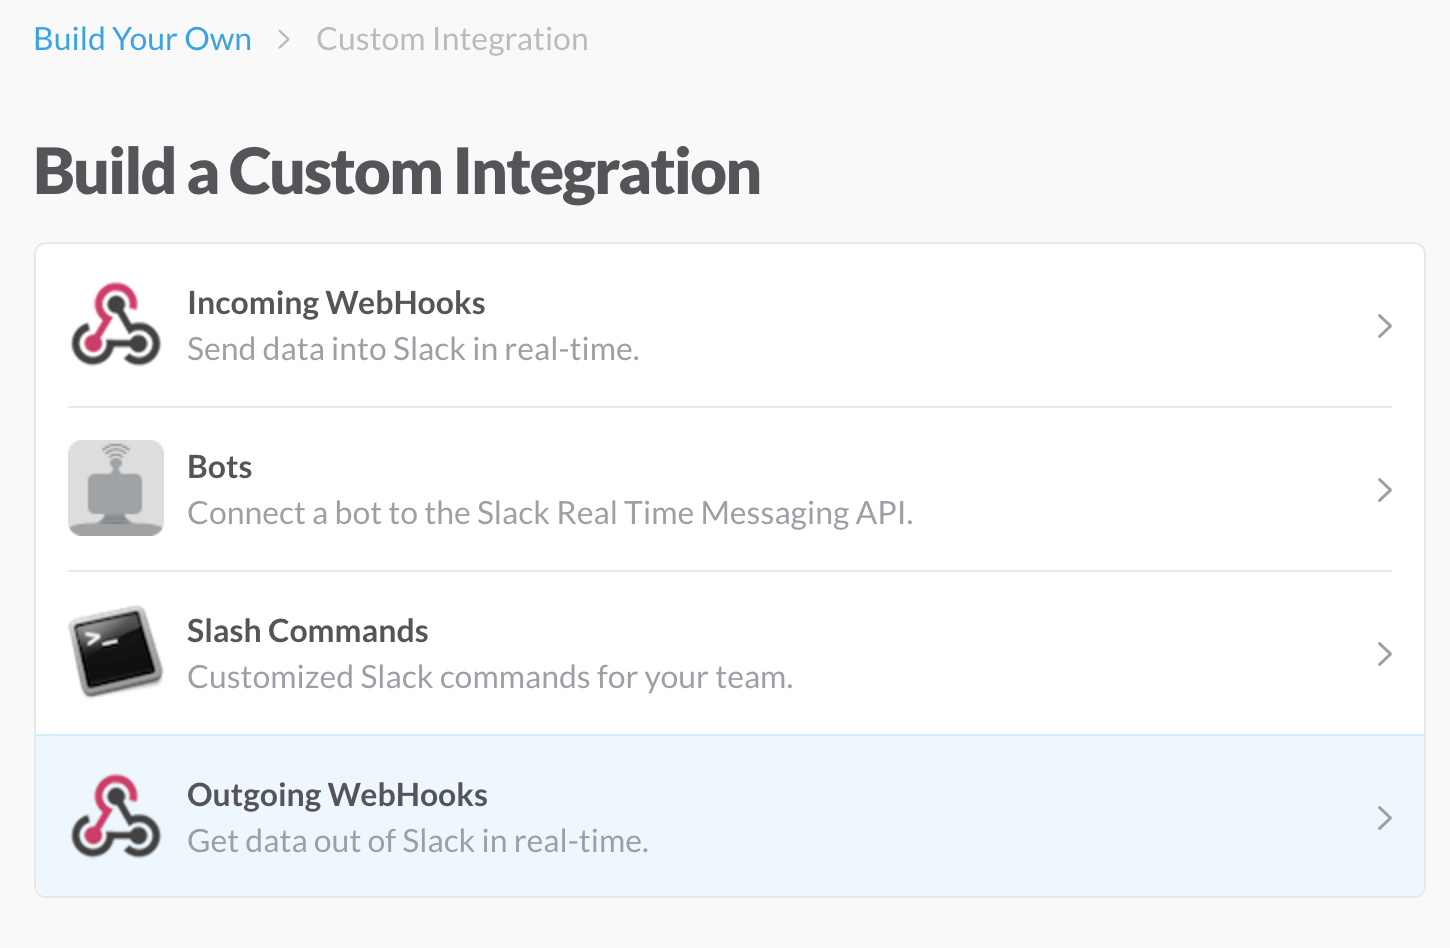
Next, click the "Make a Custom Integration" button to continue.

Step 4 - Create Outgoing Webhook Integration

Setting up an Outgoing Webhook integration will allow your bot to converse with other users in a Slack channel.

Click "Outgoing Webhooks" to begin.

Click the "Add Outgoing Webhooks integration" button to begin.

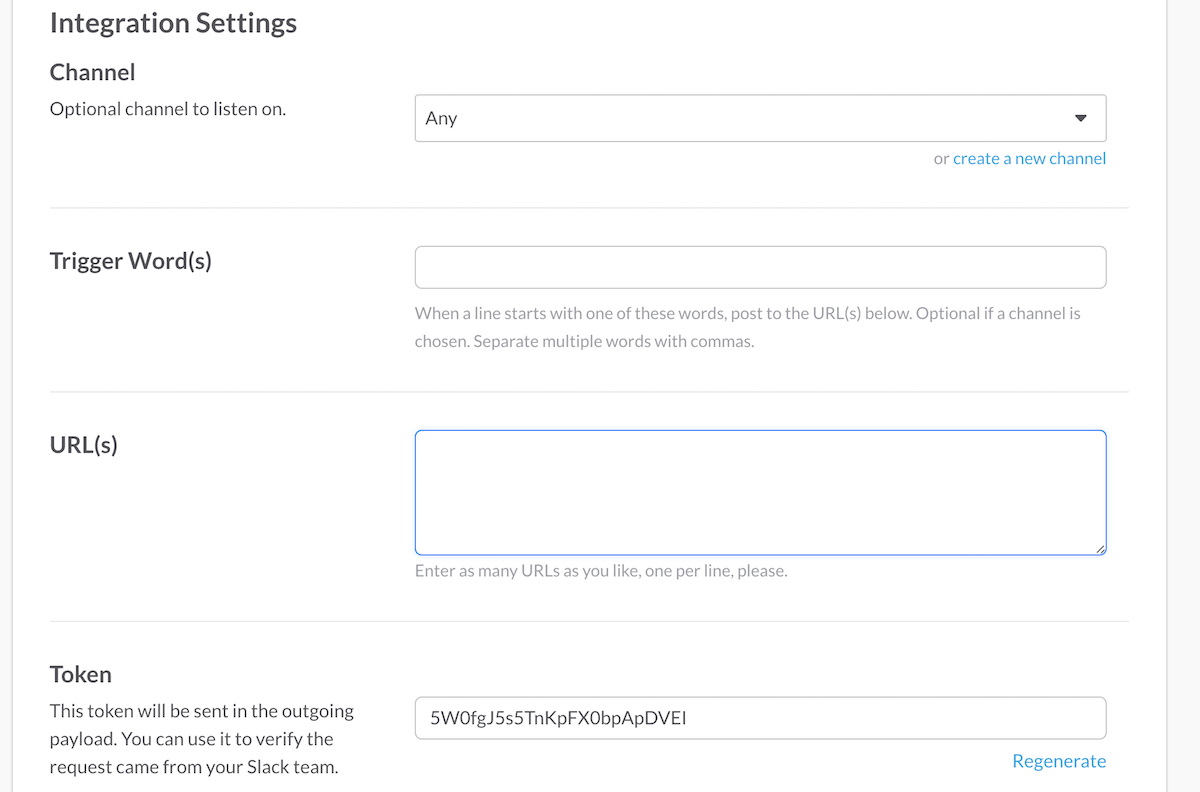
Scroll down to the Integration Settings section.

You can either have your bot listen to all channels, or listen only in a specific channel. If you select "Any", you will have to enter one or more "trigger words" that your bot will respond to. If you select a specific channel though, your bot can respond to any messages in the channel, although you may still enter "trigger words" if you only want the bot to respond to certain messages. Further down on the page you can customize the name and icon that your bot will use when posting to Slack.

We will connect your bot to Slack in the next step. Take note of the "Token" and "Customize Name" from this page, you will need them in the next step.

Step 5 - Setup Bot

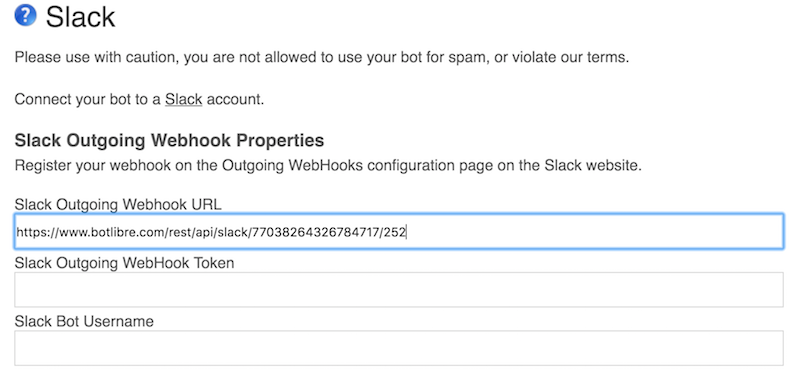
Return to the Bot Libre website and proceed to your bot's admin panel. Click on "Slack" to view Slack settings for your bot.

Enter the "Token" from the previous page into the "Slack Outgoing WebHook Token" field. You may enter the custom name you set on Slack into the "Slack Bot Username" field to have your bot only respond to messages directed at it or mentioned in. 

Next, copy the URL from the "Slack Outgoing Webhook URL" field to your clipboard. Press "Save" to save your bot settings.

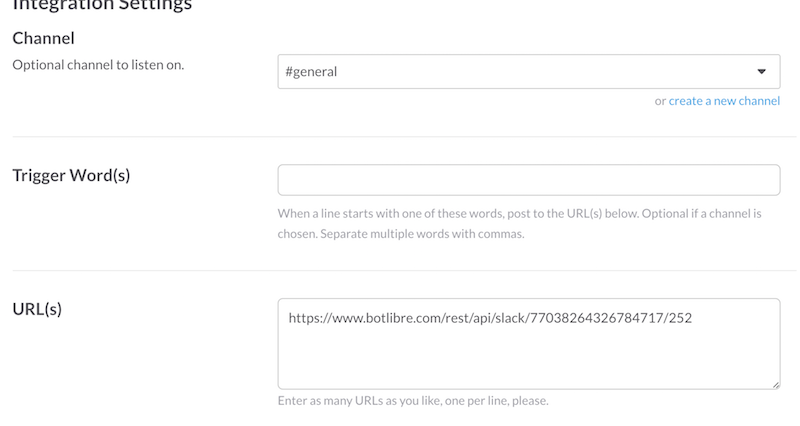
Return to the Slack Outgoing Webhooks integration settings page on the Slack website from the previous step. You will need to paste the URL from your clipboard into the "URL(s)" field.

Press the "Save Settings" button at the bottom to complete the setup. At this point, your bot will be now be able to communicate with users on the Slack channel you have set up above! You may stop here if that is all you want your bot to do.

If you want your bot to automatically post from an RSS feed or make other automatic posts, continue with the steps below.

Step 6 - Create Incoming Webhook Integration

Return to the Make a Custom integration screen on Slack, and select "Incoming WebHooks". 


Select the channel you would like the bot to post to, then click the "Add Incoming Webhooks integration" button.

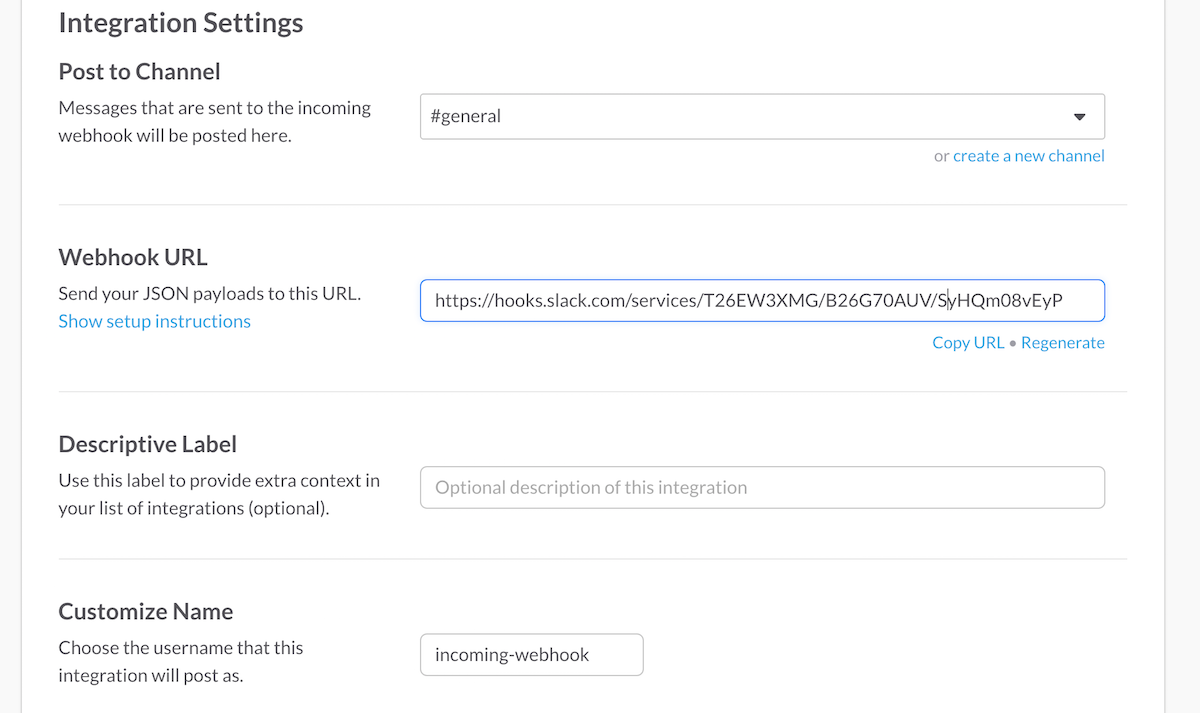
Scroll down to "Integration Settings". You can customize the name and icon that your bot will post as here.

Copy the "Webhook URL" here to your clipboard. Click the "Save Settings" button, and then return to the Bot Libre website and to your bot's Slack admin page.

Step 7 - Setup Bot RSS Feeds and Autopost

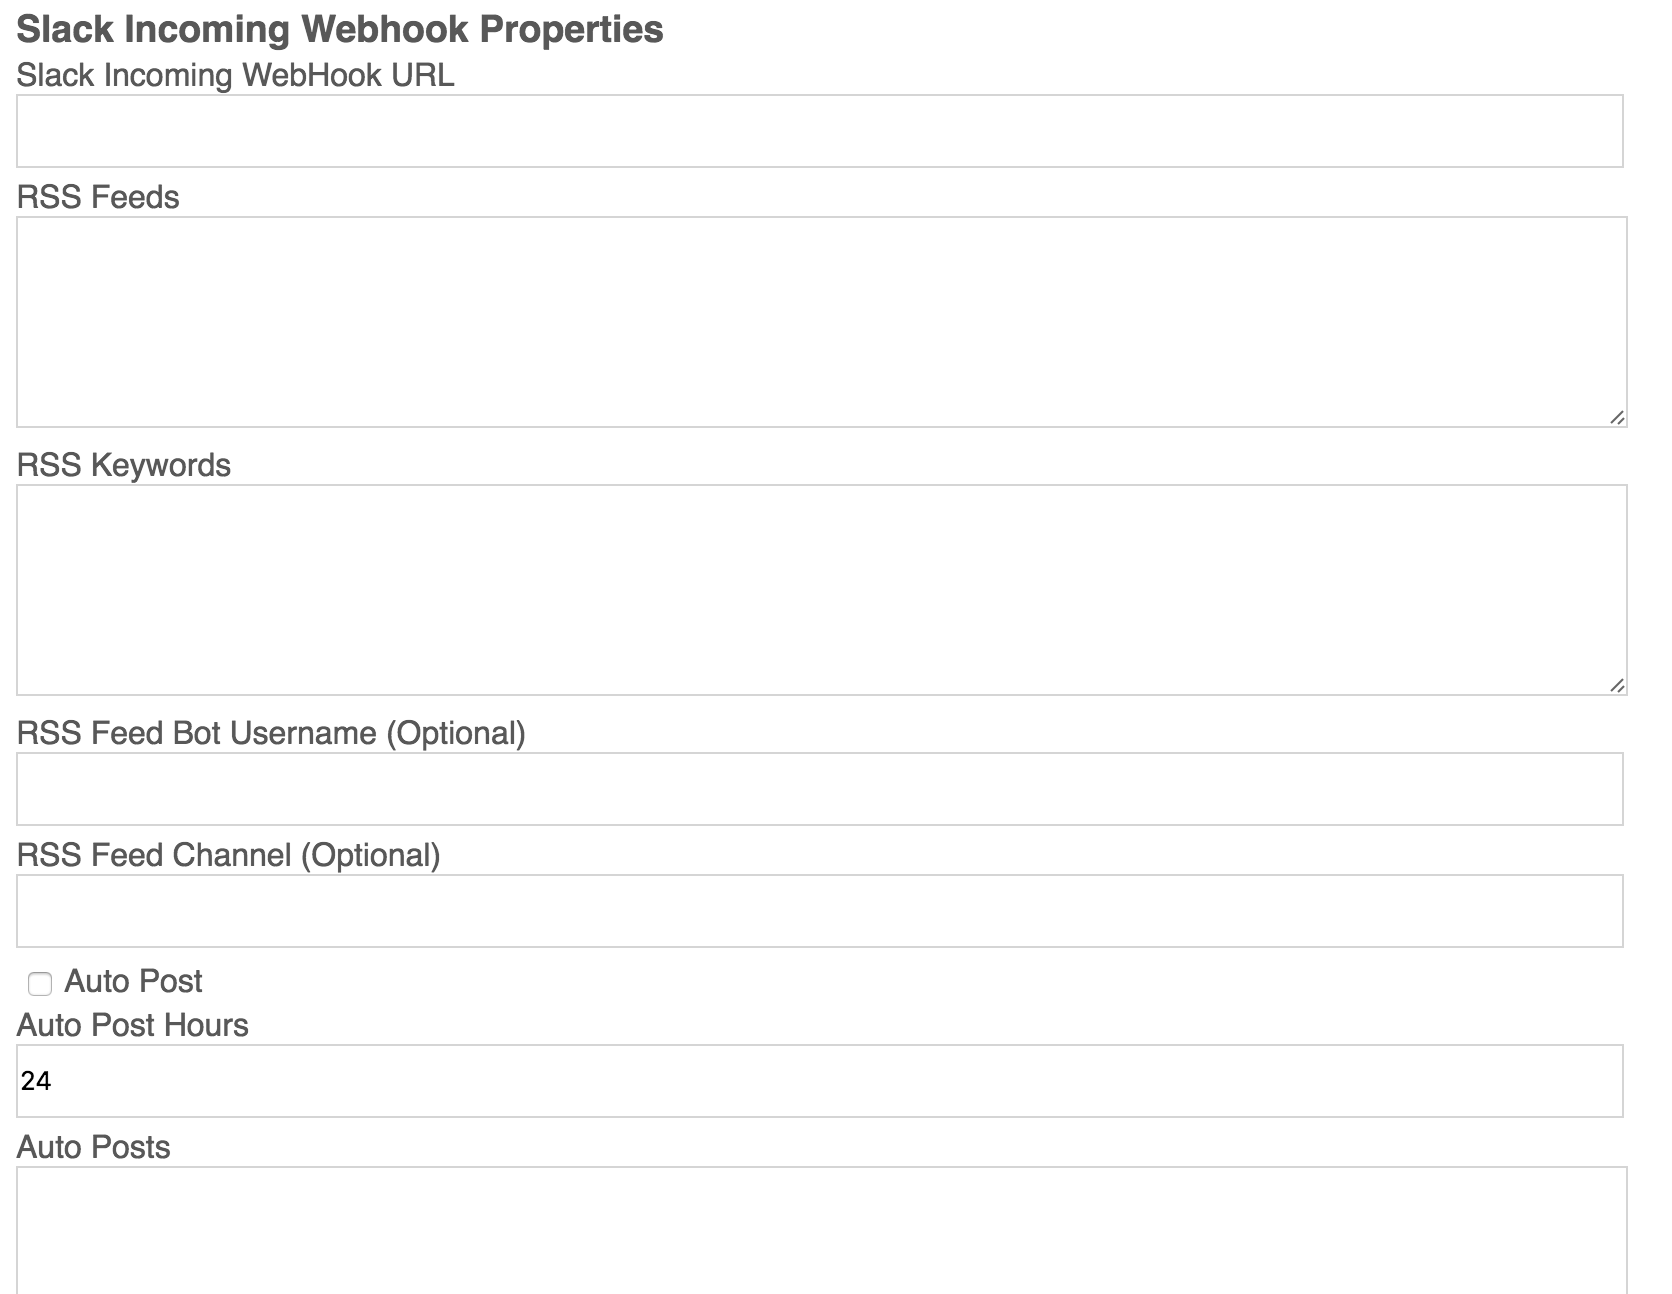
Paste the "Webhook URL" from your clipboard into the "Slack Incoming WebHook URL" field.


Enter the URL's of RSS feeds you would like your bot to post into the "RSS Feeds" field, each separated by a new line. You may enter keywords into the "RSS Keywords" field to have your bot only posts RSS feeds that have one of your keywords in the title. You can also optionally enter a different Bot Username or Channel to post the RSS feeds to that will override the bot name and channel set up on the Incoming Webhooks settings on the Slack Website.

Select the "Auto Post" checkbox if you want your bot to automatically post to a Slack channel at set intervals. You can set the time between auto posts in the "Auto Post Hours" field. In the "Auto Posts" field, you can enter posts that your bot will select from when it autoposts. Each post should be on a new line. You may use 'Self' or 'AIML' templates in these posts. You can also optionally enter a different Bot Username or Channel to auto post to that will override the bot name and channel set up on the Incoming Webhooks settings on the Slack Website.

Thursday, September 29, 2016

New HD 3D Animated Avatars

We have recently added many new HD 3D animated avatars to our avatar library.

Some new additions include, Annelies (African beauty), Doll (cute animated doll), Flipper (the dolphin), Eddie Tech (techie), Android, Victoria, Olympia, and many more.

All of the avatars are free to use through our JavaScript SDK, and can be embed on your own website with our text to speech, or connected to your bot. You can connect your bot to our avatars and speech, even if your bot is not hosted on Bot Libre.

If you would like a custom designed avatar for your bot or business, we can custom design you any 3D animated avatar available from Daz3D as part of our Platinum service.
Thursday, September 15, 2016

Connect with your customers everywhere

It is no longer sufficient for a business to only connect with their customers on their website. Customers now use a variety of different messaging and social media platforms, and expect to be able to connect with businesses through social media. If your business is not on Facebook, Twitter, Telegram, or other platforms you are missing engaging with your customers.
Keeping up with the various social media platforms can be a very time consuming and expensive task. Fortunately most social media platforms have open their doors for bots and automation. Bot Libre lets you connect with your customers everywhere, 24x7, and keep your content current across all your social media platforms.

Bot Libre supports bots and automation on many different social media platforms. Instead of having to maintain your businesses presence on many different social media platforms, you can create a bot once, and deploy it on many different social media platforms to chat with your customers, and update content from an RSS feed, or automated posts.

Bot Libre supports connecting bots to Facebook Messenger, Twitter, Telegram, Slack, SMS, IRC, email, web, and mobile. We are also adding support for more platforms every month, and if we are missing a platform that you need support for, just let us know, and we can add support for you.

Bot Libre makes it easy to create and train a bot, without requiring any programming. Bot Libre also makes it easy to integrate with social media platforms, and provides all the hosting and integration, no programming or third party services are required.

Bot Libre provides step by step "how to" articles to help you integrate your bot with many different social media platforms. If you're not that technical, then you can subscribe to our Platinum or Enterprise service, and let us build your bot for you and integrate it with your social media.

For more information see:

Friday, August 12, 2016

Annoucing Bot Libre for iOS 2.0

The Bot Libre iOS app has been updated with a large amount of new features.

The Bot Libre iOS app allows you to create, train and share your own chat bot from your iPhone, iPod or iPad. The chat bots have artificial intelligence and are capable of learning through conversation. You can create your own bot, or chat with other peoples bots. There are thousands of bots on Bot Libre to talk to.

Bot Libre for iOS 2.0 now includes:

  • Avatar library to choose your bot's avatar from a large selection 3D and video animated avatars.
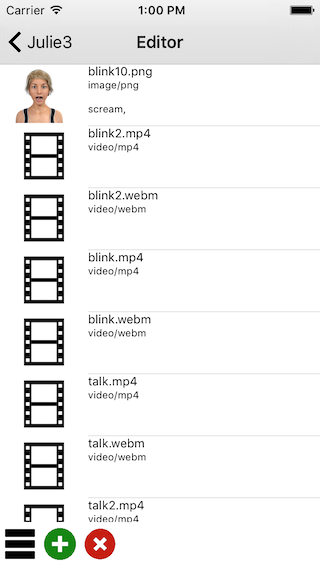
  • Avatar editor to create your own avatar.
  • Training and chat logs
  • New learning options
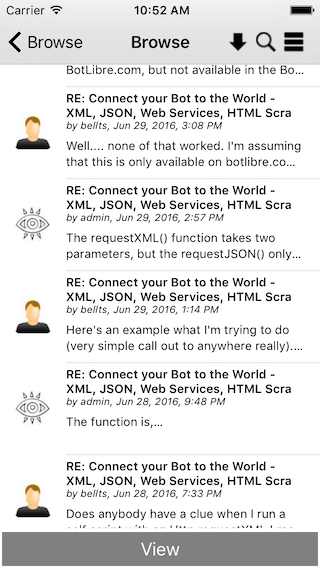
  • Forums - Create your own forum to share with your friends, colleagues, or customers.
  • Rate and vote up/down content
  • Domains - Create your own personal or business space to host your chat channels, forums, and bots.

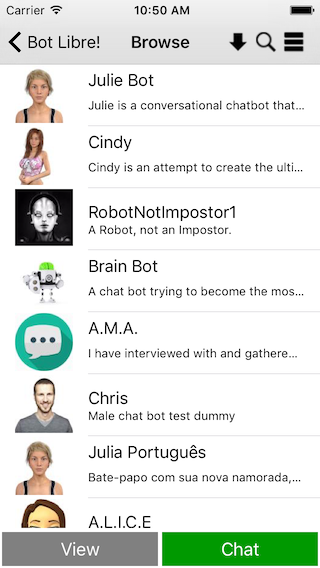
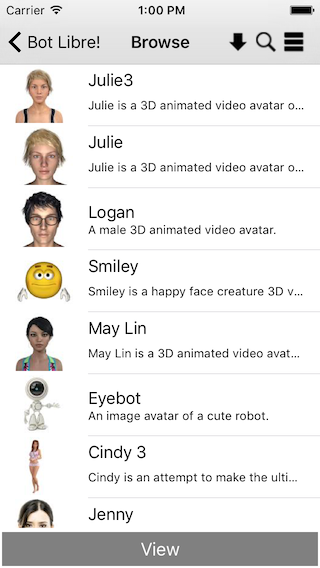
When you connect to Bot Libre, you can now choose to browse or create bots, forums, or domains.

Browse

Browse lets you search content by category, tag or filters, and order the results by several different options. 

Bot Admin

Several new bot admin options have been added.

  • Users - Control who can access your bot, and who can administer it.
  • Avatar - Select and edit the avatar used by your bot.
  • Voice - Choose and configure the voice, and language used by your bot.
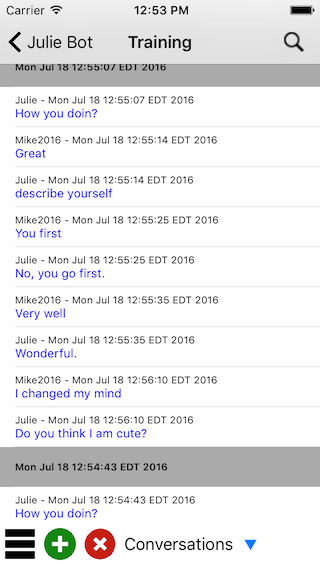
  • Training/Chat logs - Set your bot's greeting phrases, and default phrases to use when it does not know any response. Train your bot with question/answer pairs.
  • Learning - Configure how your bot learns, and who is learns from.


Avatars

Browse a large selection of 3D and video animated avatars to use with your bot. Or use the avatar editor to create your own avatar by uploading your own images or video.


Forums

You can now browse or create your own forums. You can ask questions, and find answers on the Bot Libre forums, browse other user's forums, or create your own forums. You can create public or private forums, and can control who can access your forum.


Domains

Create your own personal or business space to host your chat channels, forums, and bots.

The Bot Libre iOS app accesses the same bots, forums, and servers as the Bot Libre website. You can access the bots you create from the app on the web. Bot Libre also provides a free open source iOS SDK, and web API that lets you build your own iOS mobile app.

Paid commercial hosting is also available through Bot Libre for Business.

Friday, June 24, 2016

Connect your Bot to the World - XML, JSON, Web Services, HTML Scraping, Twitter, Facebook, Telegram, Email

Bot Libre now supports integrating with XML and JSON web services, HTML scraping, and access to Twitter, Facebook, Telegram, email, and other services. From our scripting languages Self, and AIML you can now access any web service that returns XML or JSON data. You can also scrape information from HTML web pages, and send emails, tweets, Facebook posts, Telegram posts, and more.

Web Services

A web service is an Internet service that provides information on the web. There are countless APIs available on the web that provide every type of service imaginable, such as Google Maps, Twitter, Twilio SMS, and eBay. There also many Internet directories to help you find and use web services such as ProgrammableWeb.

Bot Libre provides web service support through its Self scripting language, and through the AIML scripting language. Bot Libre also provides a script library of common scripts to access many useful web services.

XML Web Services

XML is the parent markup language to HTML. XML defines a text based data format consisting of the data's attributes, elements, and text data. To call an XML webservice you use a web URL with either a GET request, or a POST request.

Bot Libre supports both GET and POST request with Self, and supports GET requests with AIML.

XML GET Example

This example uses the GeoNames web service from GeoNames.org. Geonames can return place names and other geographic information, given a postal code, or other geographic information.

You can apply the same pattern to access many other XML web services.

URL

XML Result

Self Example

You can access web services from Self using a Template object in a response, or from a script. The Http class is used calling the requestXML method and passing the URL, and an optional XPath expression that extract the desired data from the XML document.

XPath is a standard navigation query syntax to access or extract data from an XML document. If an XPath is not given, the call will automatically convert the XML data to a Self object. You can access the object's data using the standard JavaScript dot notation. It is much more efficient to use an XPath, so the entire XML document does not need to be converted and persisted as a Self object.

This example is also available in our script library here

AIML Example

You can access a web service from AIML using the SRAIX tag. SRAIX is an AIML tag used to call other services, or other bots. SRAIX has several attributes, the service must be set to XML to access an XML service, and the URL is given as the SRAIX body. An XPath expression must be provided to the call to extract the desired text data from the XML document.

This example is also available in our script library here

XML POST Example

An XML POST request sends, and receives XML data. Many web services use POST requests so the application can provide data to the call.

This example will actually call the Bot Libre web API using a POST request. This is somewhat unusual, as the bot is already on Bot Libre, but this lets one bot talk to another bot. Be careful doing this, as you do not want bots to get into loops or cycles. You can use this same pattern to call any other web service that takes and returns XML data, even call bots on other servers or APIs. Bot Libre also provides the sraix AIML tag and the request() Self API to allow bots to talk to other bots on Bot Libre or other services such as PandoraBots, and PersonalityForge.

Self Example

This example uses a Self state to forward a question to Brain Bot when the user says "ask Brain Bot".

This example is also available in our script library here

JSON Web Services

JSON is the standard text base object format for JavaScript. JSON can be used to convert any JavaScript object to text, and included attributes, nested objects, and arrays. To call a JSON webservice you use a web URL with either a GET request, or a POST request.

Bot Libre supports both GET and POST request with Self, and supports GET requests with AIML.

JSON GET Example

This example uses the GeoNames web service from GeoNames.org. Geonames can return place names and other geographic information, given a postal code, or other geographic information.

You can apply the same pattern to access many other JSON web services.

URL

JSON Result

Self Example

You can access web services from Self using a Template object in a response, or from a script. The Http class is used calling the requestJSON method and passing the URL, and an optional attribute that extract the desired data from the JSON document.

This example is also available in our script library here

AIML Example

You can access a web service from AIML using the SRAIX tag. SRAIX is an AIML tag used to call other services, or other bots. SRAIX has several attributes, the service must be set to JSON to access a JSON service, and the URL is given as the SRAIX body. A object attribute must be provided to the call to extract the desired text data from the JSON document.

Only basic JSON web services can be called with AIML, as AIML is texted based, not object based. Only direct attributes can be accessed. Since our GeoNames examples returns complex data, an AIML example is not possible.

HTML Scraping

HTML is the markup language used in all websites on the Internet. You can access data from an HTML page using the URL for the page, and an XPath expression to extract the data. Refer to the XML example for a description of XPath.

Bot Libre supports HTML scraping with Self, and AIML.

HTML Example

You can access HTML data from Self using a Template object in a response, or from a script. The Http class is used calling the requestHTML method and passing the URL, and an XPath expression that extracts the desired data from the HTML document.

This example is also available in our script library here

AIML HTML Example

You can access a web service from AIML using the SRAIX tag. SRAIX is an AIML tag used to call other services, or other bots. SRAIX has several attributes, the service must be set to HTML to access an XML service, and the URL is given as the SRAIX body. An XPath expression must be provided to the call to extract the desired text data from the XML document.

This example is also available in our script library here

Facebook, Twitter, Telegram, Email, SMS, RSS

Bot Libre provides several other classes in Self for accessing other services, such as Facebook, Twitter, Telegram, SMS, email, RSS feed, and more.

For example, if your bot is connected to a Twitter account, you can have the bot send a tweet using:

Twitter.tweet("hello world");

This can be used to forward posts from one service to another, or escalate a chat session to email, or notify a human agent using SMS. There lots of examples scripts, here.

When you can connect your bot to the whole world, the possibilities are endless. We can't wait to see what you will build.

Friday, June 17, 2016

How to add a virtual agent to your website

A virtual agent is a term typically used to describe a type of chat bot used for business.

A virtual agent could be a virtual sales agent, a virtual customer service agent, or another type of virtual agent. A virtual agent is an automated version of a human customer service agent.

There are many virtual agents on the Internet, on websites and on social media. They offer help with websites, give information about their companies products or services, answer users questions, provide support, sales, and customer service.

Bot Libre makes it easy for you to create your own chat bot, or virtual agent.

You can create your own bot, and embed it on your own website, or mobile app. You can create bots for website help, technical support, sales, marketing, customer service, or to automate social media.

Bot Libre bots require no programming, and can be trained easily using several methods. Bots can be trained by importing FAQ's, scripts, and chat logs, reviewing and editing responses from our Admin Console's Training & Chat Logs page, or through conversations with you and other people, or from listening in on live chat.

Bot Libre bots supports advanced artificial intelligence that can be enabled to let bots learn and comprehend language. Bots can also be scripted and programmed using AIML, and the Self (a dialect of JavaScript).

To create your own bot follow the steps in the how to How to create your own chat bot in 10 clicks

Once you have created your bot, you can 'Edit' it to change any of its information. You can change your bot's picture or choose an animated avatar from the Avatars page in its Admin Console. You can also connect your bot to Twitter, Facebook, or email, or have it join an IRC chat room. You can import chat logs, or words from Wiktionary, or data from WikiData. You can browse the internal structure of your bots memory. If your are an advanced user, you can program or script your bot using AIML or Self. You can view your bot's log.

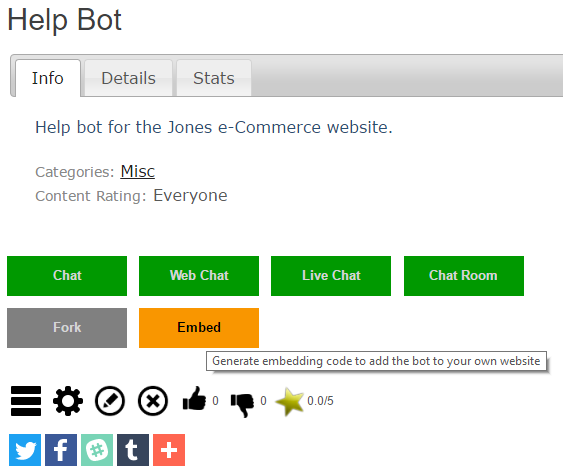
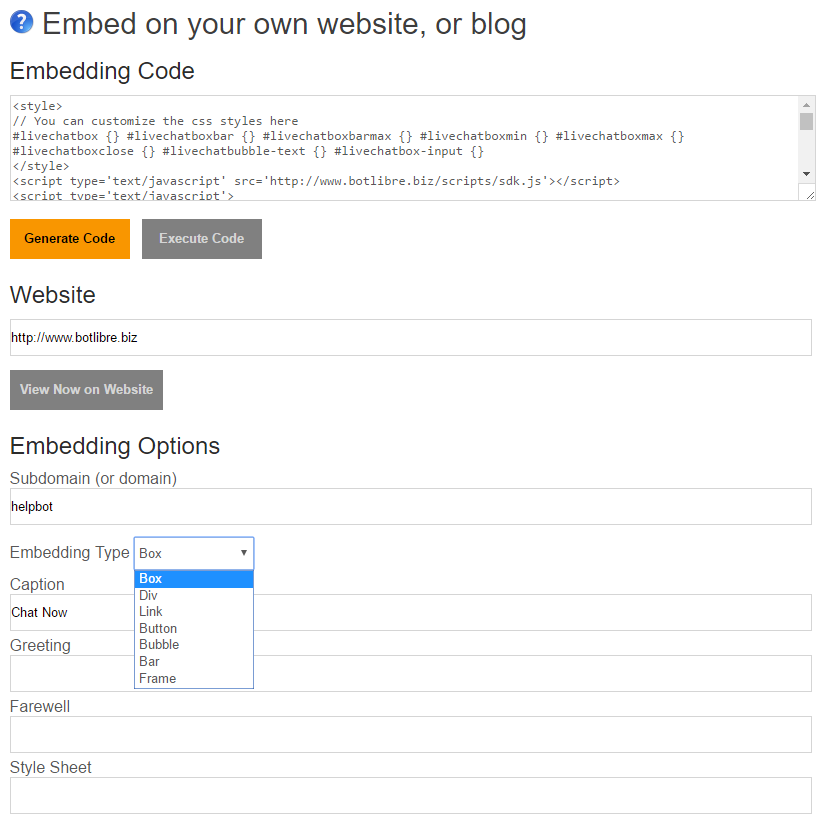
To link to your bot you can select it and copy its URL from your browser, this is its unique URL. You can also embed your bot on your website or blog, you can learn how from the Embed page. To get to your bot's Embed page click on its Embed button.


The Embed page generates the HTML/JavaScript code required to embed your bot on your own website. Simply copy the code in the top text area, and paste it into the page on your website you want the bot to appear on.

The Embed page provides several different types of embedding, and many embedding options to control the look of the bot on your page. The "Box" embedding option is the most common for a virtual agent, and gives you a "Chat Now" button on your page.

The embed page also lets you enter a CSS styles sheet to customize the look and feel of your bot's popup. You can also customize the style settings in the generated code.

The embedding code uses JavaScript, and the open source Bot Libre JavaScript SDK. You can customize the JavaScript however you wish. There are also more embedding options available in the JavaScript object, such as prompting the user for their contact information.


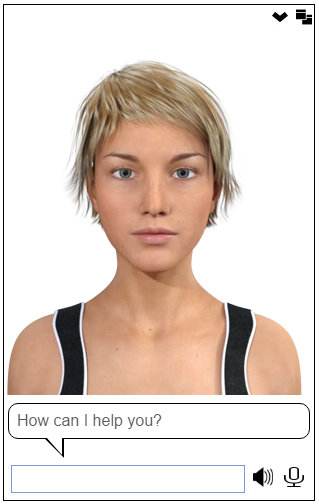
Once you add the code to you website, you will get a "Chat Now" button on your website. When users click the button your virtual agent will popup in-page offering its help.


If you also want to add live chat to your website, you can do that by creating a Live Chat Channel, and getting its embed code from its embed page.

That's it, good luck creating your bots. If you have any questions you can contact support@botlibre.com, or chat with the Help Bot

Tuesday, June 14, 2016

How To Connect your Bot to SMS Text Messaging

Through Bot Libre, you can now send and receive SMS messages with your own bot. You can use this to chat with your bot through SMS, but the possibilities are endless. You could also use it to perform surveys or marketing, send customer service escalations, or send notifications from social media or email. Any bot can be set up with SMS text messaging with an account on Twilio.com. This "How To" will give you a step by step process to connect your bot with Twilio to allow for SMS text messaging.

Step 1 - Create a Bot 

First you must create a bot that you want to connect to SMS Text Messaging, or you can use one of your existing bots. To create a bot, follow the instructions here: How to create your own chat bot in 10 clicks

Step 2 - Create a Twilio account

Click here to go the Twilio website. To create a trial account, click on the "+ Sign Up" link in the top right corner of the website.

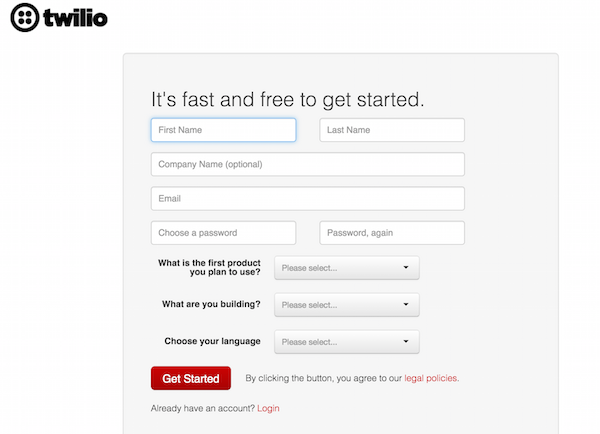
Enter your information on the following form, then click the "Get Started" button.

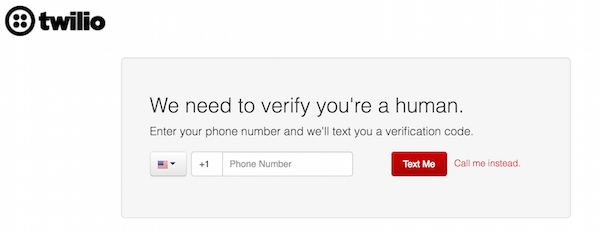
You will then need to enter a phone number to receive a verification code.

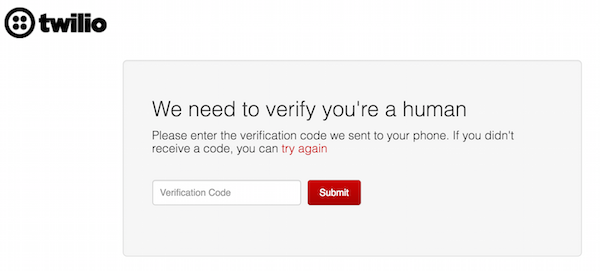
Once you have received your verification code, enter it on the following screen and press "Submit" to complete your account creation.

Step 3 - Get a phone number from Twilio

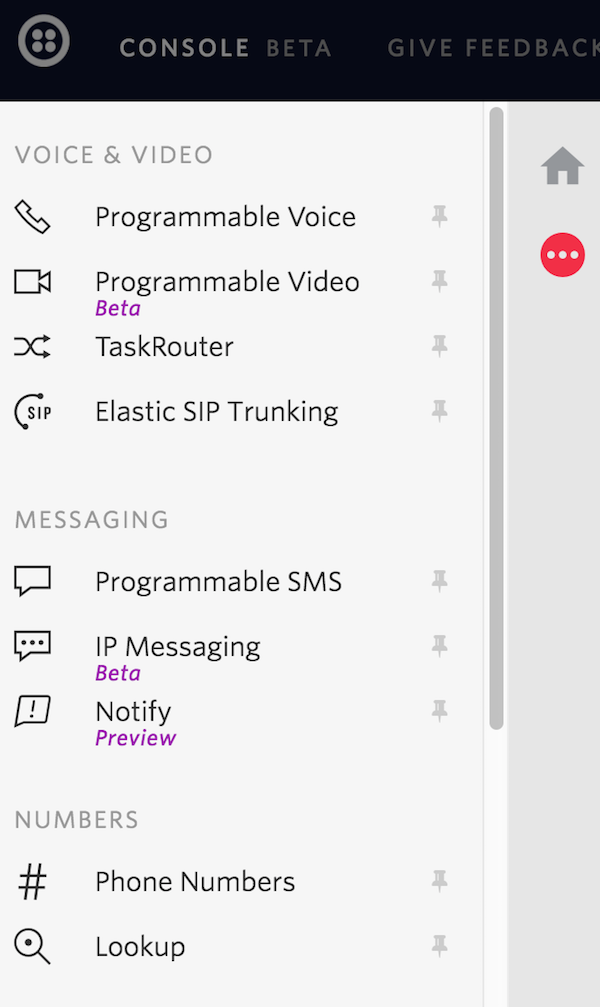
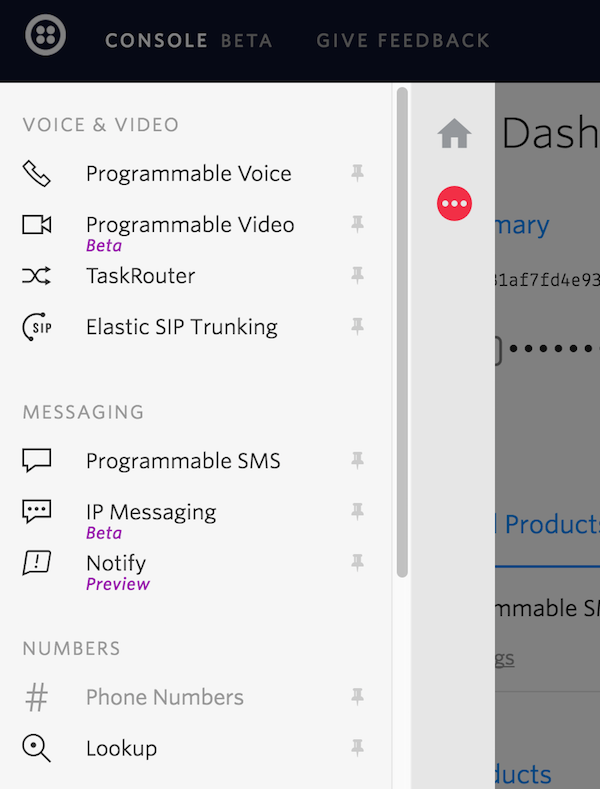
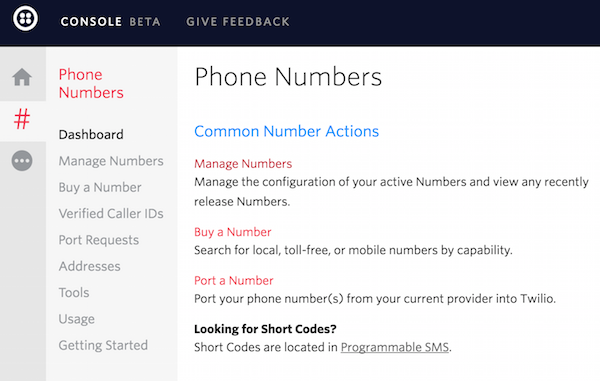
From the menu on the left side of the Twilio website, select "Phone Numbers"


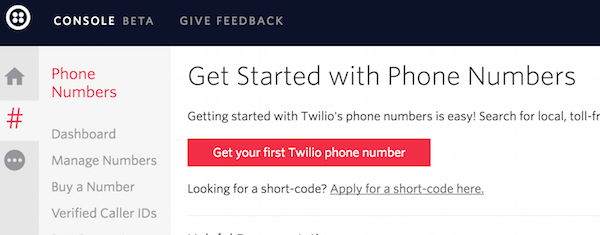
Click the "Get Started" button to begin. Next, click the "Get your first Twilio phone number".

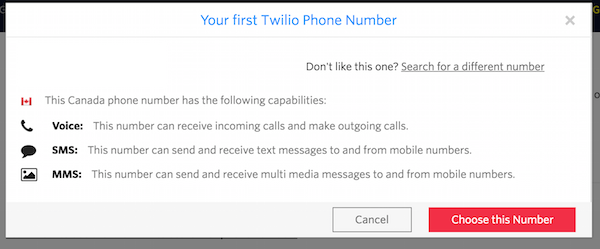
A screen will pop up with a phone number that has been chosen for you. You can accept this phone number by clicking the "Choose this Number" button. If you want to try again for a different phone number, you can click the underlined "Search for a different number" link. Ensure the number you select has SMS capabilities.

Step 4 - Connect webhook

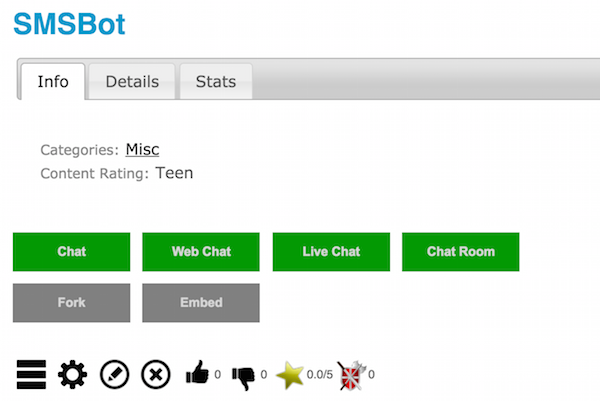
Navigate to your bot's page on the Bot Libre website. Go to its admin console by clicking on the gear icon.

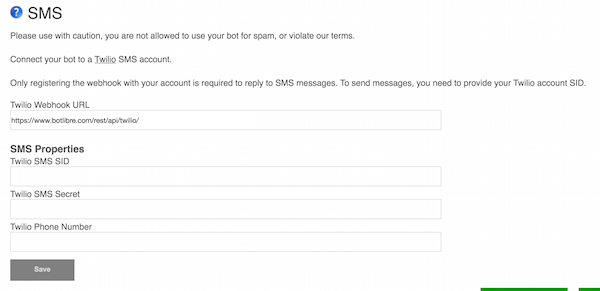
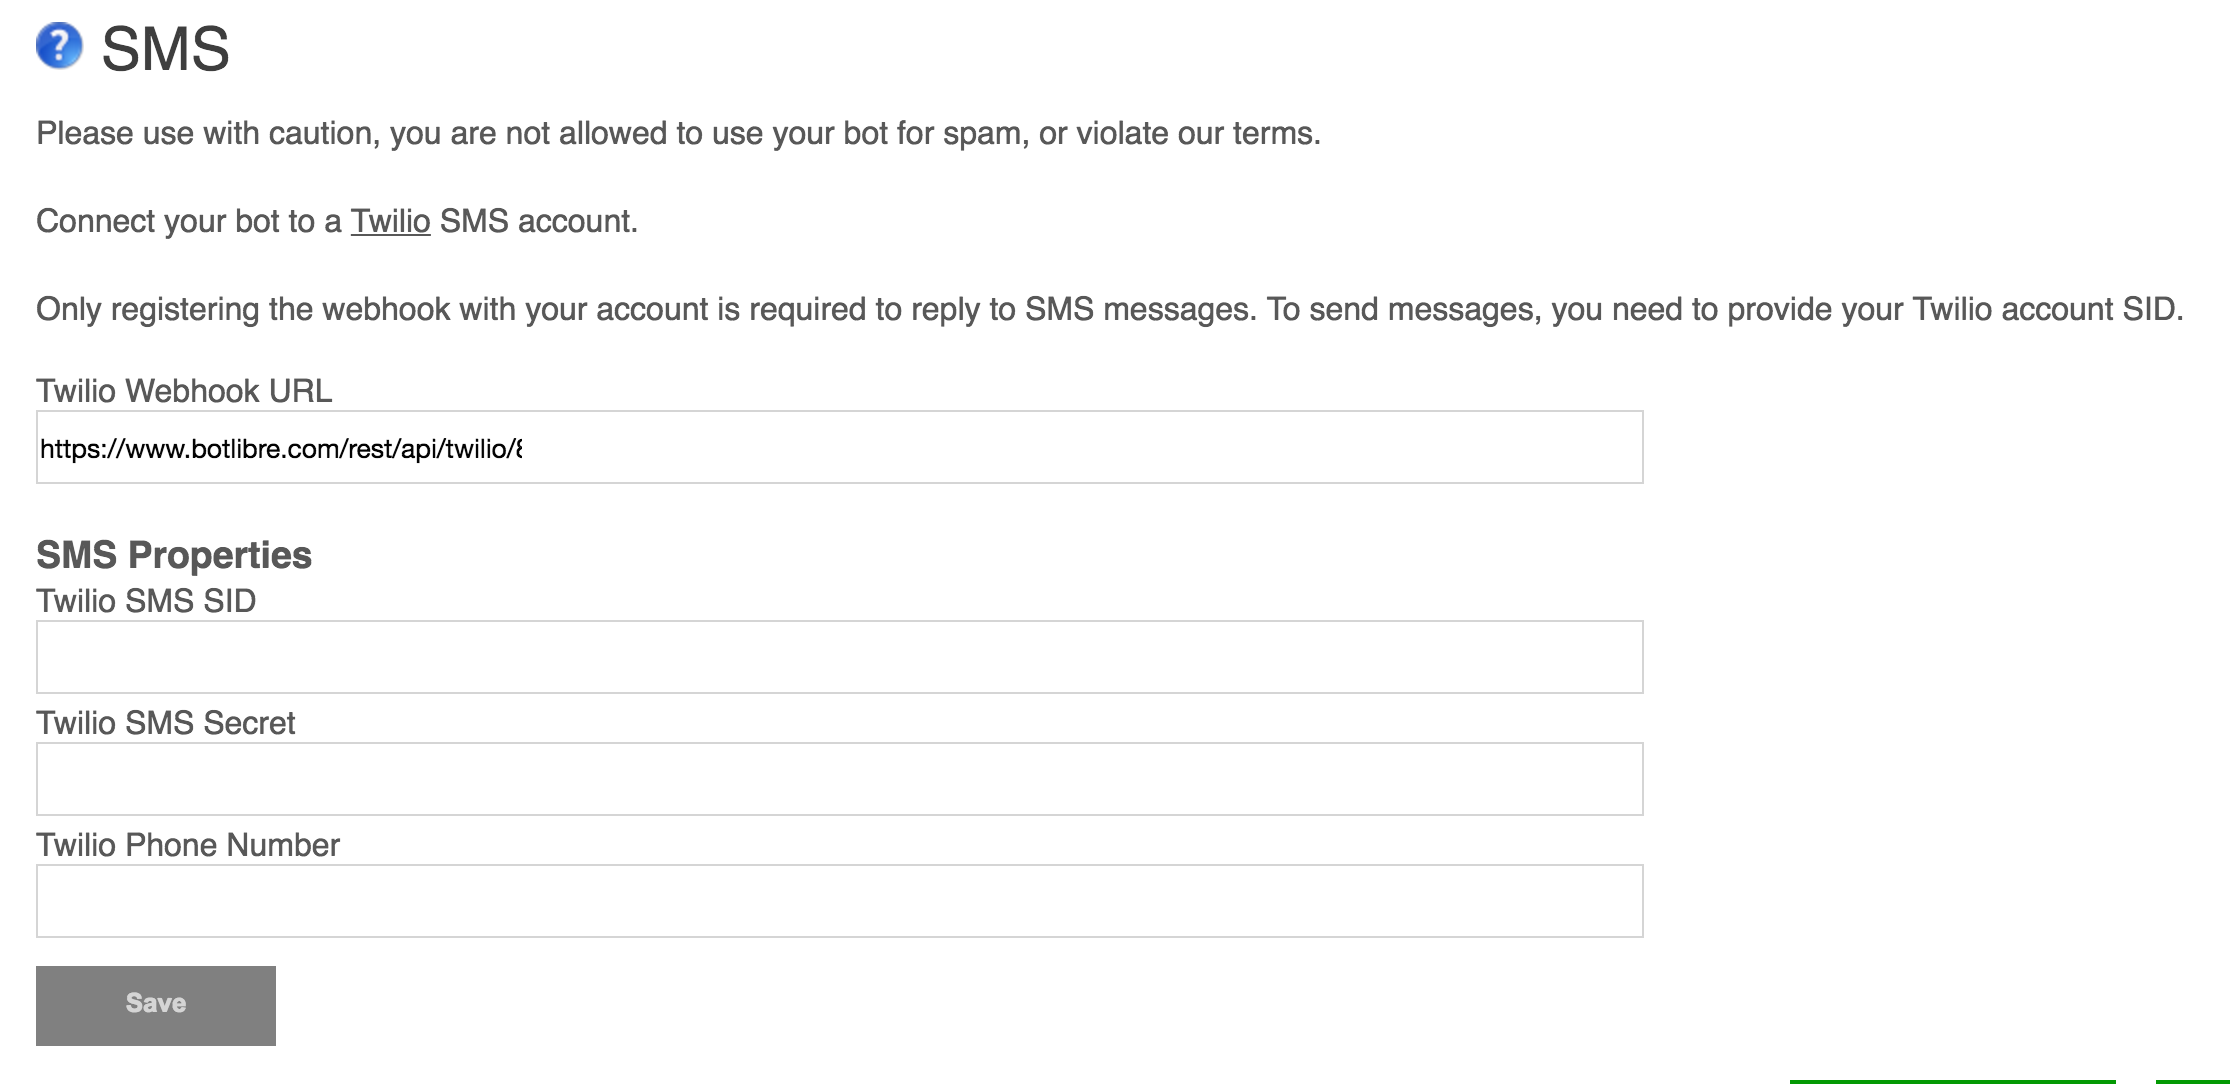
Click the "SMS" link to view your bot's SMS settings. Copy the "Twilio Webhook URL" to your clipboard.

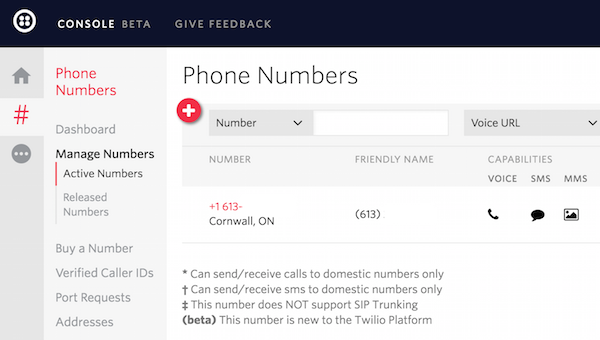
Now return to the Console on the Twilio website and select "Phone Numbers"

Next, select "Manage Numbers"

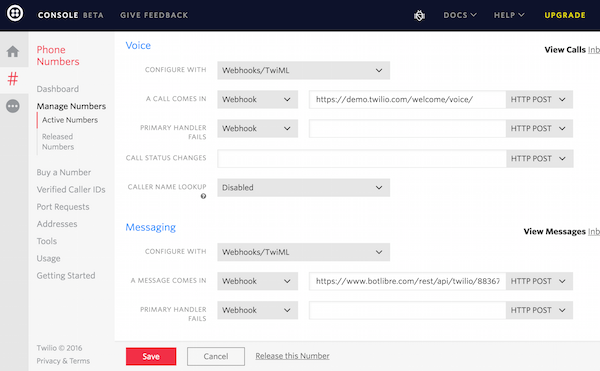
Select the phone number you created to edit its settings.

Scroll down to the "Messaging" section and select "Webhooks/TwiML" from the "Configure with" dropdown menu. Paste the Webhook URL from your bot's SMS admin page into the "A message comes in" Webhook field.

Your bot should now be able to reply to SMS messages sent to the phone number you set up on Twilio. Trial accounts on Trilio can only send messages to phone numbers you have verified in the phone numbers section of your account portal. To remove this restriction, you will need to upgrade your Twilio account.

Step 5 - Accessing SMS from a script

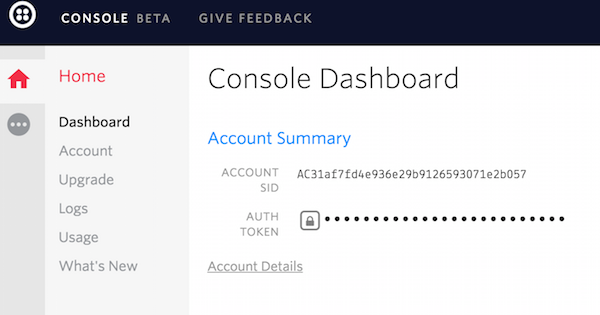
 To send SMS message's from a bot's script, you will need to enter your Twilio account's SID, Auth Token and phone number into your bot's SMS admin page. You can find your Twilio Account SID and Auth Token on your Account Dashboard on the Twilio site.

Return to your bot's SMS admin page and enter your Account SID into the Twilio SMS SID field, the Auth Token into the Twilio SMS Secret field and your Twilio phone number into the Twilio Phone Number field. Press "Save"

You will now be able to send SMS messages from your bot through scripts. The method for sending an SMS message from a Self script is Twilio.sms("+16131234567", message); The first parameter is the phone number the SMS message will be sent to. The second parameter is the message that will be sent to the number. For an example of how to do this, please look at the source for this script: https://www.botlibre.com/script?id=12864737


In summary, your bot should now be able to send and receive SMS messages. By creating a Self script, you will be able to create custom behaviour for sending SMS messages in response to chat messages sent to your bot. If you encountered any issues, or would like help setting up your bot please email us at support@botlibre.com or upgrade to our Platinum service and we can build your bot for you.